Sidekiq is a background task processor, similar to Cron, but for Ruby. All you need to do is write the tasks method and tell Sidekiq to execute it asynchronously. Sidekiq also comes with a decent dashboard, these screenshots are from the Gamely Digests Discourse Sidekiq.
Capistrano extends the Rake DSL to provide ways to run scripts on servers. It’s main usage is for deploying apps onto servers. On jotter.io and data.gg I have it set up so running this command…
will upload the latest version to my server, run any migrations and restart the app on the server. I can also deploy a staging version or rollback to the previous version if something goes wrong.
On the server the directory structure looks like this…
Devise is user authentication for Rails. Devise will setup all the parts necessary for users to register, login, reset passwords, etc. If you know your project needs use logins, Devise is a no-brainer. You’re always going to want to modify the way the forms look so Devise provides a command to generate all the views for you to change. For everything else, Devise has a massive
‘How-to’
section on their Wiki.
Simple Form is a tool to help you make forms in Rails. Rails comes with its own way to do forms but I’ve never been happy with it. Simple Form is very similar for the basics.
Simple Form really shines for me when it comes to associations and configuration. Associations can be done as simply as this…
Part of the install process adds some configuration files allowing you to set the input types, internationalization, what classes to apply to what components by default, priority countries in country picker drop-downs and much more.
One of the my targets for Gamely Digest is that it is kept simple and pain-free to maintain. For the first few reviews, I had to manually create thumbnails, rename and convert 50 images in GIMP. This drove me to write some bash scripts to automate the process.
The first script loops over every file in the current directory and renames it to gamename_X.jpg (X being a number from 1 to the total count of the files in the directory). Below is an example of the scripts execution.
The next script uses
Image Magick
which is a fantastic library and toolset to create, edit, compose and convert images. Image Magick is a huge subject and outside the scope of this article but the command I’ve used below is very basic.
This one loops over every JPG file in the current directory, uses the Image Magick convert command to resize the image to 30% of its original size and appends a ‘t’ (t for thumbnail) to the end of the filename.
My next job to tackle is reviewers submitting different size images causing reviews not to line up.
The expanded images can continue to have a different size but thumbnails need to be consistent. I plan on tackling this by using ImageMagick to remove pixels from the edges so we end up with a consistent thumbnail size. I’ll post my solution to this at a later late.
Recently I’ve been gathering data from
gov.gg
census reports as far back as 1971 for
data.gg
. The earlier census reports are scanned and the later ones have been created electronically but don’t copy and paste correctly. By the end of manually copying the data from the first table I knew I’d have to find a better way. After a bit of searching I found
Tesseract
, an OCR (Optical Character Recognition) tool. OCR tools take an image and attempt to convert any text it finds in the image into usable text. Google has even had a hand in Tesseract.
Tesseract is extremely easy to use. All you need to do is give it the image and an output file.
There are plenty of other options available to optimise for your particular situation and even multiple languages supported. For me Tesseract worked perfectly except for the occasional 3 and 8 getting mixed up. Here is an example I created earlier…
We started Gamely Digest in 2013 to make a more digestible way to follow video games. The older I get the less time I have to play games and deciding what is worth playing is time consuming in itself.
When I was younger I noticed something similar with hardware. Once I took up software development I had less and less time to keep up with hardware components. Nowadays, I still build computers from components but do research at the time of purchase. I am extremely grateful for hardware sites that do guides on what to buy, they have save me so much time and effort. I want to do something similar for video games.
Before I’d even written a line of code, I knew Gamely Digest needed to be simple to maintain, static (no databases) and fast. Having used Jekyll previously, I used that. Jekyll is a static site generator. Instead of using a database, you create content using Markdown and Liquid templates. Jekyll generates the site into a folder, ready to be uploaded straight to your web server.
For example, if I was to use HTML to generate the reviews page, it would look something like this:
Using Jekyll, I just write this:
Behind the scenes, I have a folder called ‘_posts’ and Jekyll knows to find the posts for the loop in there. Each post has things associated with it such as title, date, layout, author, etc. Once the site has been built using Jekyll, you get the same HTML as above.
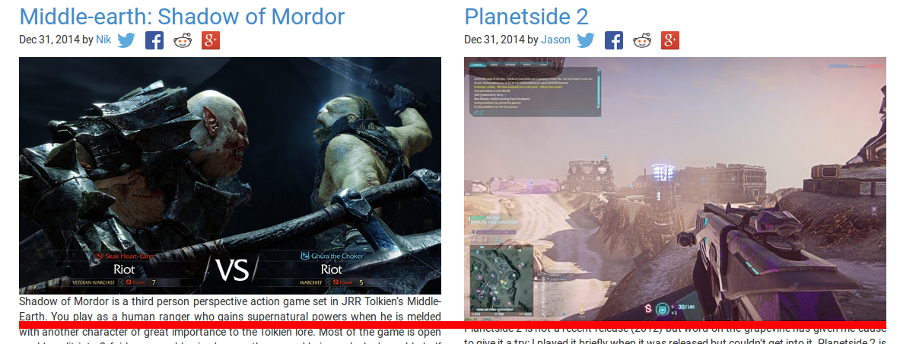
Reviews have improved a great deal since the release. Initially I had some of the layout, repeated inline image code and adsense code in there. This was becoming too time consuming to maintain. Now, I’ve extracted the adsense and inline image code into the Jekyll ‘_includes’ folder. Includes can also have parameters, allowing me to pass the filenames of inline images.
The difficultly was the sidebar images, I needed to be able to pick the images that go inline in the review and the order they appear in the sidebar. In the end I have come up with a quite elegant solution to minimize repetition. Integers are the naming convention for images on Gamely Digest. Reviews only ever use JPG images so the extension is assumed.
_posts/2015-01-01-my-review.html:
In the
front matter
I am creating an array containing the names of the images in the order they should appear in the sidebar. Front matter is an the area between the two triple-dashed lines in which you can set predefined variables or create and set custom variables. I use this area for things like twitter slugs, authors, excerpts, dates, titles, etc. ‘layout’ is a predefined variable telling Jekyll what layout file to use for the page.
_layouts/review_layout.html:
The review layout is used by all reviews and uses the ‘sidebar-image-order’ variable to loop and select the images for the sidebar.
Using this system I can copy and paste the reviews from our shared storage directly into the post file leaving me to set the sidebar image order, place an adsense advert in an appropriate place and place inline images in the article.
Sometimes you do still need a databases but for simple things like personal sites, blogs, business sites and product homepages Jekyll is an excellent choice. Once upon a time you would use WordPress for your blog because of its facility to comment on posts but with products like
Disqus
and
Discourse
, you don’t always have to use WordPress. Of course Jekyll does have some downsides, it requires Ruby to be installed and for non-technical users, it is not as simple as logging in and using a What You See Is What You Get (WYSIWYG) editor to create content.
Jan 1 0001
date: “2016-12-09T20:25:06Z”
title: Creating meshes from SHP files
permalink: /2016/12/creating-meshes-shp-files/
A while ago now,
Digimap
gave
data.gg
a SHP file containing elevation data for Guernsey, Sark, Alderney and Herm. Using this data, I’m going to place a WebGL widget on
data.gg
allowing users to fly around the islands. There’s two ways to approach this:
Create a height-map using the SHP data and generate game engine terrain using it. This would be done using geographic software to rasterize the data into a normal image (like a PNG) with white pixels representing high points and black pixels low (e.g. sea level).
Triangulate the XYZ points in the SHP file to create 3D meshes. This is done using an algorithm to join all the points together to form edges and faces.
This post is going to be about the latter method which is to create a mesh. I’ll do a separate post about the other method in the future. Both approaches have different pros and cons—the mesh approach may be more detailed, while game engines (which is ultimately what the WebGL widget will be) will handle terrain better performance-wise.
To create the mesh I’m going to be using
Blender
, an awesome open-source 3D graphics editor. You’ll also want to grab an add-on called
BlenderGIS
, which is a “bridge between Blender and geographic data.”
Import
Using the menu, import your SHP file. Note that the ability to import SHP files comes from the BlenderGIS add-on.
These options will appear. The field holding the elevation in my case is called ZVALUE.
Point Cloud
Depending on your data size, this could take a while, but eventually the add-on will do its job and create vertices for all the XYZ coordinates.
What you have here is known as a point cloud. There are loads of tools and algorithms to triangulate point clouds into meshes, but BlenderGIS comes with one called ‘Delaunay,’ which worked perfectly for me. It’s in the tools area (press T) under the ‘GIS’ tab.
Mesh
Again—this could take a while depending on your data size, but eventually you’ll be presented with a mesh containing edges and faces. Due to my data set containing rock formations around the islands, it has created some planes joining the rocks to the island and other rocks. Select one of the planes and press Ctrl-Shift-Alt-F to select all linked flat faces as in the screenshot below. Use X to delete these faces.
There we have it. One mesh.
I have a large data set, so my mesh has 433,775 faces, which is too many to be usable. There are a couple of ways to simplify a mesh, but I found using the ‘Decimate’ modifier with a collapse ratio of 0.03 produced good results. Below I’ve reduced the mesh to 5,987 faces.