Jason Magee

Windows 10 Lockscreen Ads

Feb 25 2016

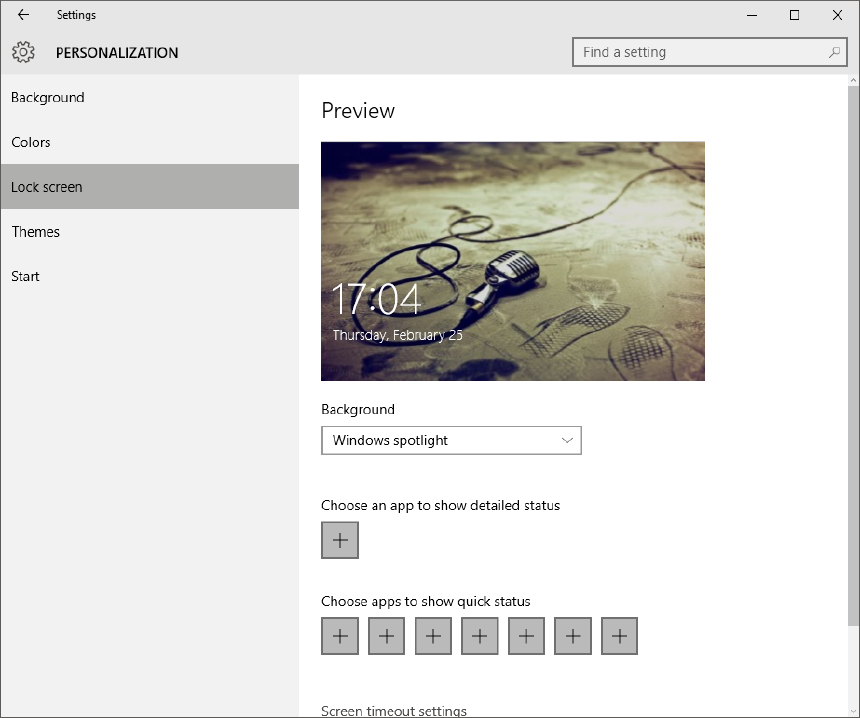
It seems now that Windows 10 is trying to push adverts onto its users via the lockscreen. There are two modes this appears to be impact, you can see what yours is set to by going into the ‘Personalization’ area and looking at the ‘Background’ drop-down.

If you have it set to ‘Windows spotlight’ then you’re going to get adverts. This mode rotates between a range of images provided by Microsoft. You can click a button on the lockscreen to say you “don’t like” the advert but the long term impact of this is unknown. 

Image

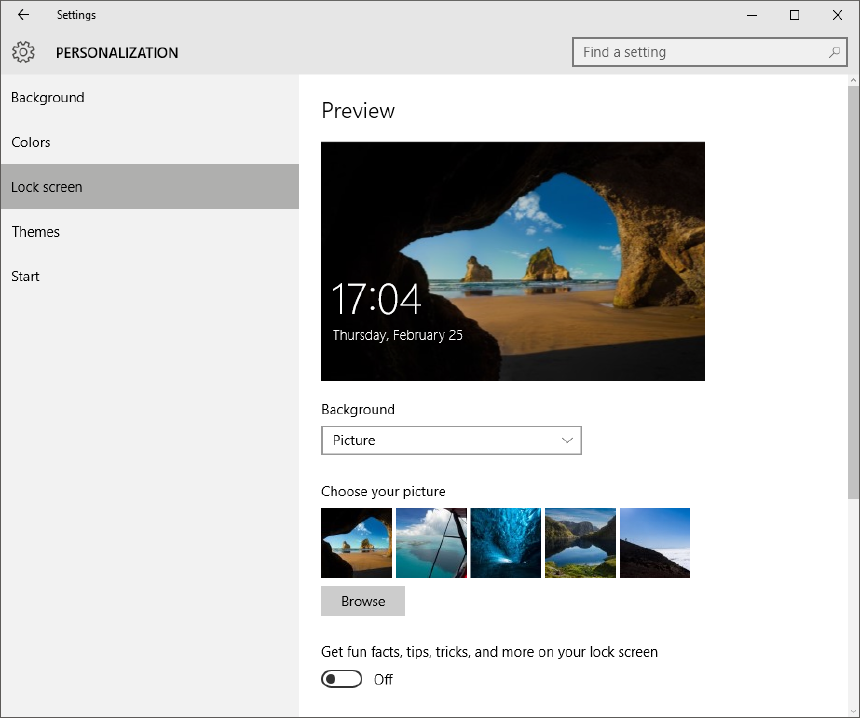
In ‘Picture’ mode shown below, you can disable the adverts by turning “Get fun facts, tips, tricks, and more on your lock screen” (“and more” would appear to mean adverts all up in your grill) to “Off”. 

Image

Guernsey Global Games Jam 2016

Jan 14 2016

I recently participated in the Guernsey Global Games Jam 2016 and with our team we’ve created a cracking game called ‘Sacrificial Inferno’. Here is the website.

Here are a couple of work in progress videos…

Sacrificial Inferno Gameplay & Mechanics
Sacrificial Inferno Procedurally Generated Levels

Also, I’ve uploaded a couple of real life photos from the event onto my gaming website, gamelydigest.com . See here .

Windows 10 Privacy Settings

Sep 13 2015

The latest release of Windows has quite a few settings for privacy which I’ve documented below.

General

These settings relate to advertising in Windows Store apps and via the Internet. I’ve turned both off. The SmartScreen Filter suggests it will block known dodgy URLs from being accessed in third party Windows Store apps.

Taken from here your Advertising ID is “is a unique identifier, consisting of a random string of characters, which Windows generates for each user on a device. When turned on, apps can access the ID in order to deliver advertising that is relevant to you based on your app usage. You can turn it on or off at any time. If you turn it on again, a new identifier will be generated.”

Image

Location

I have this off on my desktop and on, on my laptop. The answer to this one comes down to “Do I need this?”. You can read more here .

Image

Other Devices

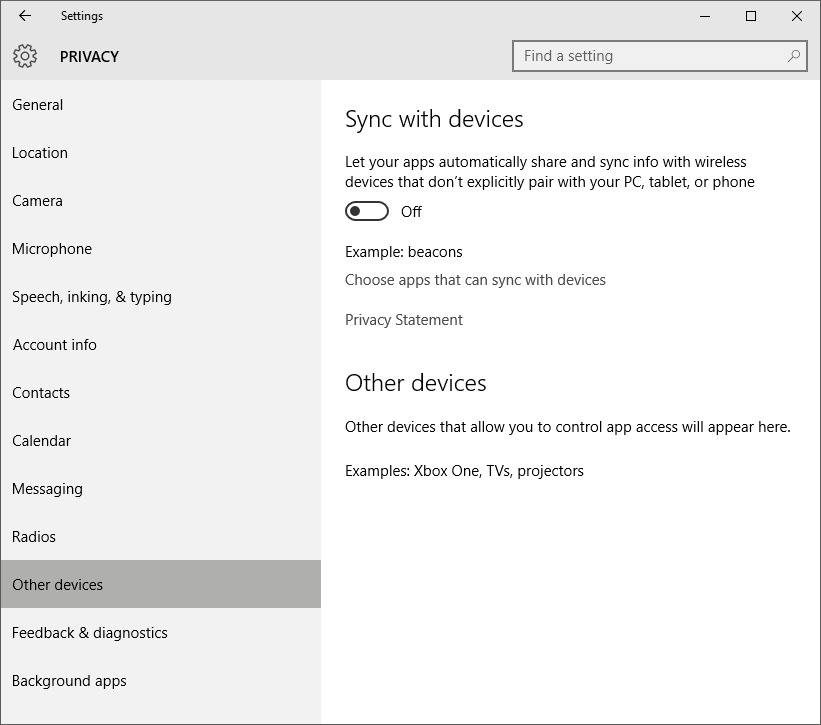
I’ve switched this off on my desktop and laptop. I don’t want anything being synced. From what I can find on Microsoft’s website this will sync things like your theme, browser settings and passwords. Also, this seems to suggest these are synced via Microsoft’s servers rather than peer-to-peer.

Image

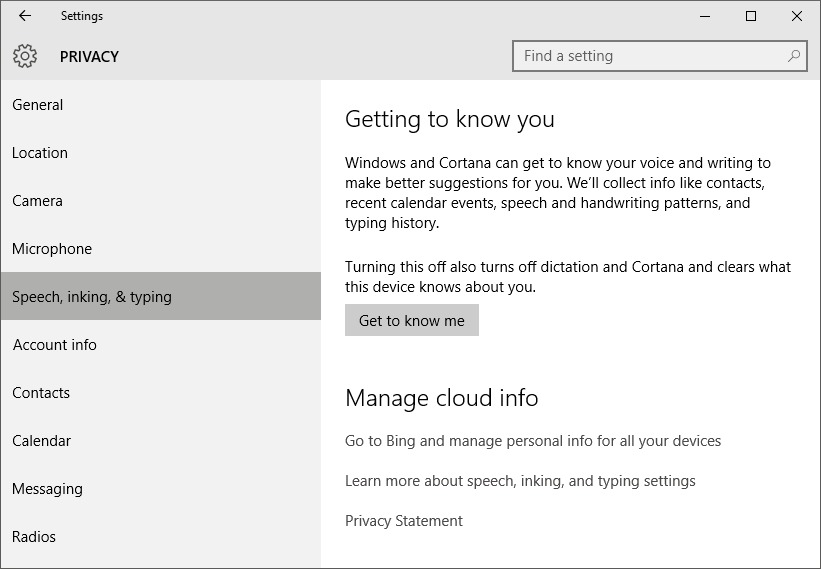
Speech, Inking and Typing

If you want to use Cortana you’re going to need to leave this option on. Leaving it on will send speech, inking, typing, contacts and calendar to Microsoft. I’ve turned it off. You can read more here .

Image

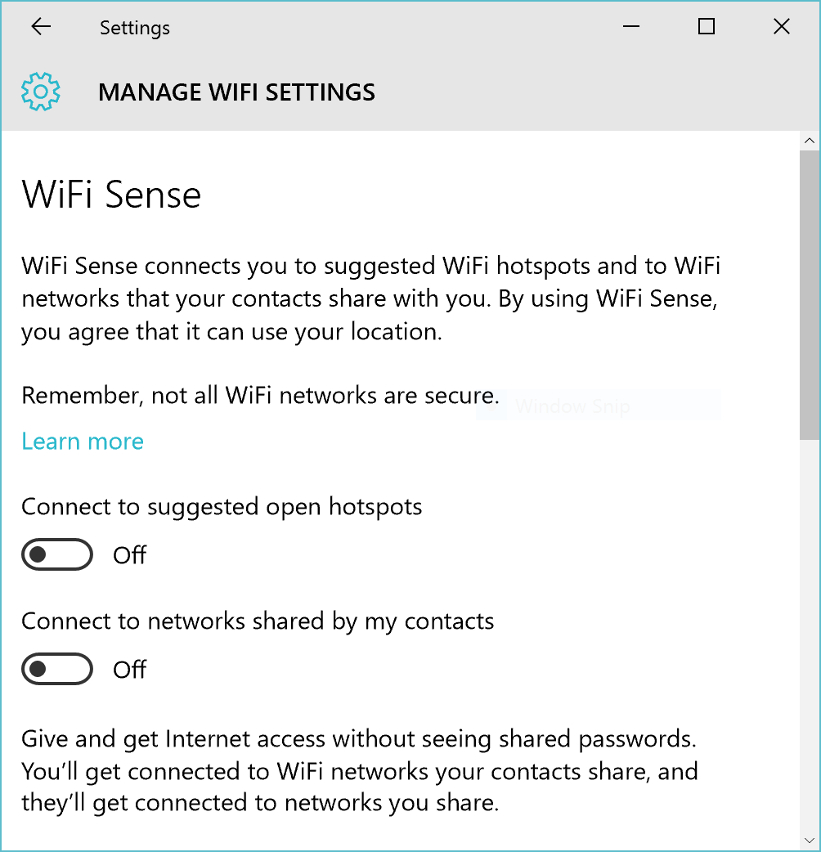
Wifi Sense

Wifi Sense is a feature allowing Windows 10 to share Wifi passwords with your contacts. This means the Wifi passwords are potentially hackable and so this setting should be switched off. On the first screen below, click “Manage Wifi settings” to get to the Wifi Sense settings. You can read more here .

Image
Image

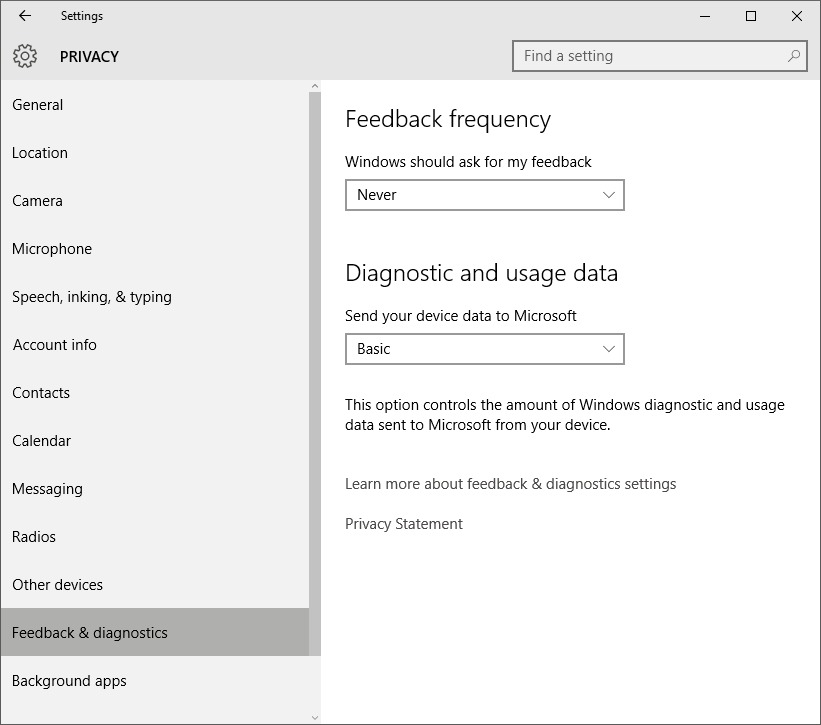
Feedback & Diagnostics

This section is a bit sneaky. Microsoft have lumped diagnostic (e.g. crash data) in with general usage data. Looking at the documentation you want to set this to “Basic” which is the minimum. Basic still includes sending Microsoft what software you have installed but there does not appear to be a way around that.

You can also disable the prompts for feedback here too.

Image

HTTPS Blocked Mixed Content

Jun 27 2015

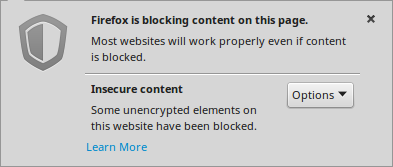
I recently came across this message after installing an SSL certificate on one of my websites.

Image

The message means that although the site is secure, some active content is not. Content can be passive or active.

Passive includes tags like…

< < a i v u m i d g d i > e o o > >

As you can see, these all tend to be view type content.

Active includes tags like…

< < < @ s l i o i c i f b m r n r j p i k a e o p > m c r t e t t > > >

Although some of the active tags can be used for view type content like the passive ones, they can also be used to make Document Object Model (DOM) changes which means they have the potential to be insecure.

In my case it was due to Google Fonts import. This line in particular…

@ i m p o r t u r l ( h t t p : / / f o n t s . g o o g l e a p i s . c o m / c s s ? f a m i l y = R o b o t o : 4 0 0 , 7 0 0 ) ;

The fix is to remove the http allowing your browser to determine the protocol. You could also just set it to https instead (if supported).

@ i m p o r t u r l ( / / f o n t s . g o o g l e a p i s . c o m / c s s ? f a m i l y = R o b o t o : 4 0 0 , 7 0 0 ) ;

data.gg Publicity

Apr 23 2015

My website data.gg recently had some local publicity and I appeared on local BBC TV and BBC Radio . These links won’t work forever so if you’re from the future you’ll have to take my word for it 🙂

Login via SSH Key

Mar 29 2015

This is a follow on to my previous post ‘ Simple Security on a Linux VPS ’ in which I said I would post about how to setup SSH key access on a server. SSH key access works by adding your local machines identify to a file on the server called authorized_keys. Once your key is in the file, you can login as that server user using your local key. Previously, I would SSH onto the server and paste my local SSH key into authorized_keys using nano but I’ve since found a much quicker way to do it by running this command.

s s h - c o p y - i d < u s e r n a m e > @ < h o s t >

Simples!

SSH Tunnelling with pgAdmin

Mar 23 2015

When working with remote PostgreSQL databases it’s nice to be able to use a graphical user interface to manage the data. Fortunately, it is very straight forward to setup by creating an SSH tunnel to the remote server and then connecting pgAdmin to the server as if it’s on localhost.

The first step is to create an SSH tunnel. Replace username and host respectively.

s s h - N - L 3 3 3 3 : l o c a l h o s t : 5 4 3 2 < u s e r n a m e > @ < h o s t >

Arguments

  • N: Do not execute a remote command. We just want port forwarding.
  • L: This is the bind target on the local client. In our case we’re asking that port 3333 on localhost be bound to localhost:5432 from the remote server. 5432 is the default PostgreSQL port.

If you want the command to go into the background so you can continue to use the terminal, add an -f argument.

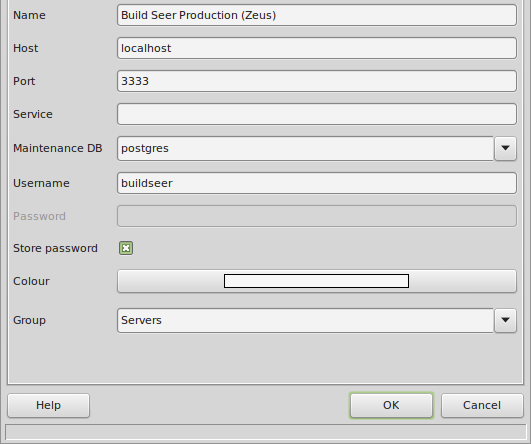
Using pgAdmin, connect as you would to a local database except use the port we’ve bound to (3333):

Image

If you ran the command as suggested, CTRL+C in the terminal will kill the SSH tunnel. If you sent it into the background using -f then you will need to kill the command by finding the background process using ps aux and grep.

$ p s a u x | g r e p 3 3 3 3

This runs the command ps aux and returns any lines containing 3333 (the port we bound to locally). The number we’re interested in is the PID, which is the second number below.

j a s o n 6 6 7 4 0 . 0 0 . 0 4 8 2 8 0 9 1 2 ? S s 2 1 : 1 5 0 : 0 0 s s h - N f - L < u s e r n a m e > @ < h o s t >

With the PID we can kill the background process by doing.

k i l l 6 6 7 4

Running the ps aux command again will reveal that the background process is no longer running.

Tired of seeing the Rails asset pipeline logging?

Mar 4 2015

Tired of seeing the Rails asset pipeline logging in the console? Disable it by adding this code…

# c o H n i f d i e g . a a s s s s e e t t s p . i l p o e g l g i e n r e = l o f g a g l i s n e g

into…

c o n f i g / e n v i r o n m e n t s / d e v e l o p m e n t . r b

Boom! No more asset pipeline logging during development. Remember to turn it back on if you have asset problems, though.

Simple Security on a Linux VPS

Feb 17 2015

I maintain a number of Linux VPS (5 at the time of writing) and wanted to cover some basic security measures. When you sign up for a Linux VPS you tend to be given a root login to set it up. You should never leave it with root access as it’s a security risk. The minimum you want to do is create a new login and prevent root from logging on via SSH. Another good precaution is to change the default SSH port. For maximum security you want to use SSH keys for access which I’ll cover in another post.

For this example I’m going to create a new login called ‘admin’ which does not have root privileges and prevent people from using SSH to connect as root. The admin user will be able to switch users to root or run commands as root using sudo but will be prompted for the password.

The first step should always be to create the new user and make sure they can login and gain root privileges. Disabling root access and then finding out the new account can’t SSH onto the VPS is a less than ideal situation…

To add a new user we’re going to use the ‘adduser’ command. This will add the user, prompt you twice for the users password and ask you to provide Full Name, Room Number, Work Phone, Home Phone and Other. I’ve only filled in the Full Name.

r A A A C C E R p C E I o d d d r o n e a h n s o d d d e p t t s a t F R W H O t i i i a y e y s n e u o o o t t @ n n n t i r p w g r l o r m h h d g g g i n e d i l m k e e e i n g n : n t r s u n n g e n g h N N P P i c s e e f w e p e a u h h [ n u e w w h i w a t m m o o ] f s r o l U s h n e b n n : o s g u m e N U s e e e e e r : ` r s e s I N w w [ r m ~ a o e X I o u ] [ [ a # d u r d f X r s v : [ ] ] t m p i r p d e a ] : : i a i ` r o a p r l A : o d n ` a e m s a u u d n d ' a d c s s p i e m u d m t ` w s d n , i c s m i o / o w a f n o e i n r e r o t o o r r n ' y t d r e r r r ' c : d d m e a ( ` : a p c d ( 1 s s t r t m 1 0 h k u i e ? i 0 0 o e c o s n 0 0 m l c n s [ 0 ) e ' e Y ) s f E / w a s o N n i d f r T ] t m u E h i l a R y n l d g ' y m f r i o o n r u p t h ` e a d d m e i f n a ' u l t

If for some reason you do not have the ‘adduser’ command, you’ll need to use the less friendly version, ‘useradd’.

At this point you need to log out of the VPS and log back in as admin. Do not proceed until you can do so!

Next, we want disable root access which involves editing a file called ‘sshd_config’. You should backup this file to admin’s home directory first by doing the following…

a d m i n @ d i s c u s s : ~ $ c p / e t c / s s h / s s h d _ c o n f i g ~ / s s h d _ c o n f i g _ b a c k u p

Use nano to edit the file. You need to sudo this as it is a protected file. Input admin’s password.

a d m i n @ d i s c u s s : ~ $ s u d o n a n o / e t c / s s h / s s h d _ c o n f i g

In the file you want to find the variable ‘PermitRootLogin’ and set it to no. This is what is will look like…

P e r m i t R o o t L o g i n y e s

Set it to no.

P e r m i t R o o t L o g i n n o

If it has a # in front of it then you need to remove that, it’s a comment.

Lastly, you need to restart SSH for your changes to take effect.

a s s d s s m h h i n s s @ t t d o a i p r s / t c w / u a r s i u s t n : i n ~ n i $ g n g s , u d p o r o s c e e r s v s i c 2 e 7 9 s 5 s 1 h r e s t a r t

Once you’ve done that, whenever you try to login as root you will get the error message.

P e r m i s s i o n d e n i e d , p l e a s e t r y a g a i n .

Gamely Digest Follow Up

Feb 15 2015

This is a follow up post to this post in which I promised to post my solution to handling thumbnails when different reviewers submit different aspect ratio images, e.g…

Image

Well, here it is..

f o r f i n . j p g ; d o c o n v e r t " $ f " - r e s i z e " 5 7 6 x 3 2 4 ^ " - g r a v i t y c e n t e r - c r o p 5 7 6 x 3 2 4 + 0 + 0 + r e p a g e " $ { f % % . j p g } t . j p g " ; d o n e

This command does the following things:

  1. Resizes the image as close to 576×324 as possible based on the smallest fitting dimension (indicated by the ^).
  2. Sets the ‘gravity’ to the centre for the next command.
  3. Takes a central crop of the image (central due to previous command) to the size 576×324. The x and y offsets give the location of the top left corner of the cropped image with respect to the original. 0 and 0 in this case.
  4. Repage which removes image data to do with virtual image location. I’ve added this simply because the documentation recommends doing so as a pre-caution when using the crop command.