This is a follow on to my previous post ‘
Simple Security on a Linux VPS
’ in which I said I would post about how to setup SSH key access on a server. SSH key access works by adding your local machines identify to a file on the server called authorized_keys. Once your key is in the file, you can login as that server user using your local key. Previously, I would SSH onto the server and paste my local SSH key into authorized_keys using nano but I’ve since found a much quicker way to do it by running this command.
When working with remote PostgreSQL databases it’s nice to be able to use a graphical user interface to manage the data. Fortunately, it is very straight forward to setup by creating an SSH tunnel to the remote server and then connecting pgAdmin to the server as if it’s on localhost.
The first step is to create an SSH tunnel. Replace username and host respectively.
Arguments
N: Do not execute a remote command. We just want port forwarding.
L: This is the bind target on the local client. In our case we’re asking that port 3333 on localhost be bound to localhost:5432 from the remote server. 5432 is the default PostgreSQL port.
If you want the command to go into the background so you can continue to use the terminal, add an -f argument.
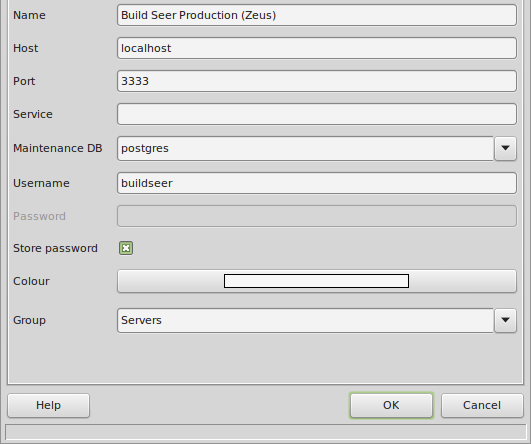
Using pgAdmin, connect as you would to a local database except use the port we’ve bound to (3333):
If you ran the command as suggested, CTRL+C in the terminal will kill the SSH tunnel. If you sent it into the background using -f then you will need to kill the command by finding the background process using ps aux and grep.
This runs the command ps aux and returns any lines containing 3333 (the port we bound to locally). The number we’re interested in is the PID, which is the second number below.
With the PID we can kill the background process by doing.
Running the ps aux command again will reveal that the background process is no longer running.
I maintain a number of Linux VPS (5 at the time of writing) and wanted to cover some basic security measures. When you sign up for a Linux VPS you tend to be given a root login to set it up. You should never leave it with root access as it’s a security risk. The minimum you want to do is create a new login and prevent root from logging on via SSH. Another good precaution is to change the default SSH port. For maximum security you want to use SSH keys for access which I’ll cover in another post.
For this example I’m going to create a new login called ‘admin’ which does not have root privileges and prevent people from using SSH to connect as root. The admin user will be able to switch users to root or run commands as root using sudo but will be prompted for the password.
The first step should always be to create the new user and make sure they can login and gain root privileges. Disabling root access and then finding out the new account can’t SSH onto the VPS is a less than ideal situation…
To add a new user we’re going to use the ‘adduser’ command. This will add the user, prompt you twice for the users password and ask you to provide Full Name, Room Number, Work Phone, Home Phone and Other. I’ve only filled in the Full Name.
If for some reason you do not have the ‘adduser’ command, you’ll need to use the less friendly version, ‘useradd’.
At this point you need to log out of the VPS and log back in as admin. Do not proceed until you can do so!
Next, we want disable root access which involves editing a file called ‘sshd_config’. You should backup this file to admin’s home directory first by doing the following…
Use nano to edit the file. You need to sudo this as it is a protected file. Input admin’s password.
In the file you want to find the variable ‘PermitRootLogin’ and set it to no. This is what is will look like…
Set it to no.
If it has a # in front of it then you need to remove that, it’s a comment.
Lastly, you need to restart SSH for your changes to take effect.
Once you’ve done that, whenever you try to login as root you will get the error message.
This is a follow up post to
this
post in which I promised to post my solution to handling thumbnails when different reviewers submit different aspect ratio images, e.g…
Well, here it is..
This command does the following things:
Resizes the image as close to 576×324 as possible based on the smallest fitting dimension (indicated by the ^).
Sets the ‘gravity’ to the centre for the next command.
Takes a central crop of the image (central due to previous command) to the size 576×324. The x and y offsets give the location of the top left corner of the cropped image with respect to the original. 0 and 0 in this case.
Repage which removes image data to do with virtual image location. I’ve added this simply because the documentation recommends doing so as a pre-caution when using the crop command.